Showing posts with label polymer clay. Show all posts

Saturday, December 8, 2012

Glitter and Feathers

Evidently, my son has inherited my love of glitter.  I don't know where he's gotten the feather love from, though!  This was a homework assignment - this was his turkey feather!  The class put all of them together on a turkey.  I haven't yet seen it, but I hope I will soon!!

I finished up all of my custom orders for the year, and this was my favorite by far:
This was for a friend, and she wanted it to represent the fact that they are expecting a new baby - we decided to add an EGG!!!!  Isn't that darling?

I have to say, using the molds for the penguin bodies this year helped SO much with my turnaround time!  Being in school, and then my son's surgery 1 week and a half ago really made it hard to manage my time, but I think I've got the hang of it now.  :-)

Wednesday, February 1, 2012

Some new stuff

I finally had some time last week to sit down and play with my clay again, and I decided to play with some chalks and ink treatments, and came up with this sunburst pendant! I like the rustic and "unfinished" appearance, and the colors are just so bright and lovely!


For a little more color, I added some orange howlite and red web jasper, and hung it from brass chain. I'm really happy with this little necklace, and fingers are crossed that it finds a good home!


Wednesday, January 4, 2012

Happy 2012!

After I closed up shop, I cranked out some ornaments for gifts. These stars were for Stephen's teachers. I also made 4 in gold - 8 in total. They were all well-received, from what I hear. :-)

I made this little bird for my Aunt, who LOVES birds! She had purchased 3 custom bird ornaments earlier this year, and this one was just a little bit different. I realize the photos are a bit blurry - I was about to package them off for shipping when I remembered that I wanted to take a picture!


This is the other side of the ornament. It's hard to tell, but the color is kind of a light blue-granite color.


I really liked making that bird! I'm planning on writing up a little tutorial for it in the next couple of weeks, and I'll probably make some for sale for next holiday season. I also came up with my idea for new family ornaments for next season too - PENGUINS!


I have a lot of new ideas for this year, but I'll probably take a little longer getting everything created than I'd like. I've undertaken the project of painting the interior of our house, as well as tiling a back splash in our kitchen after we get our new counter tops in a couple of weeks. It should be a busy spring here!

Monday, December 12, 2011

Ornaments EVERYWHERE!!!!!

I've been very busy cranking out custom Christmas ornaments this season! And there are a few that I didn't manage to get pictures of before I sent them out the door.


(Yes, I know this last one says 2010 - the customer said that they forgot to get one last year!)


And if you can believe it, I still have 2 more to finish up before I close up shop for the holidays next weekend. But stay tuned for all of the neat things I have planned for 2011!!!


Friday, August 26, 2011

New necklace

I'd been working on this pendant for a few days, off and on, and when it was done, I was stumped as to how I should use it. I had a pretty sterling silver pinch bail all picked out for it, but it just wasn't... right. So I was doing a little flickr browsing, which I do sometimes when I get stuck with a design, and was inspired to use my Irish Waxed Linen cord for hanging the pendant. I think adding in the swarovski crystals gave it a little extra texture, too!

I created the pendant using the Sutton Slice technique, where you fill in the grooves of a texture sheet or stamp with clay, and then carefully transfer it on to a flat sheet. It looks smooth because I also used large amounts of resin (I'm still learning, and it takes multiple applications for me to not "miss" any spots sometimes), but I think that makes it even more interesting! It also gives the necklace some weight, so it hangs nicely.

This is currently listed in my Etsy shop, and would make a unique addition to anyone's jewelry collection!

I plan on doing another pendant using this technique soon, so I'll take some photos during the process to show you all. It's a really interesting technique!


Thursday, August 11, 2011

Some new stuff

Something I had been wanting to try this summer was making carved Polymer Clay nuggets. They were actually a little easier than I thought they were going to be, once I got the right blade for carving. I had started out trying to use some wood-carving tools I had, but they weren't quite sharp enough, so I switched over to a much sharper blade, and that made the process move more quickly.

When I envisioned this project in my head, I had always been planning on making some sort of rainbow bead project, so I came up with this bracelet and necklace!

The bracelet beads had somewhat bigger holes so I was able to easily string them on leather, and finished with a button closure. This is almost EXACTLY what I had in mind when I was designing this bracelet in my head!!


And the necklace... *sigh.* I apparently have a weakness for this style, with the ribbon, but I think it is just such a great contrast between the rustic clay beads and the finished silk ribbon. I couldn't decide how to finish it off, so I'm leaving that up to the customer! You can just tie it at whatever length you choose!!


I'm layed up right now after having a fatty cyst removed from my left shoulder yesterday. It makes it hard to use my left arm much right now, but I can tell this is going to help a lot with my overall should pain I've been having. Already, I haven't been experiencing some of the "pins and needles" that I had been having frequently, so I'm really hopeful that this will be a good thing. In the meantime, I've been getting a LOT of inspiration, and making a lot of plans for new projects. (I also ordered some new supplies from Etsy last night - I'm really excited!!).


If you are a Facebook fan (and if you aren't, why not?!?), you have seen that I'm going to have a 200 fan giveaway. My plan was to have the piece (it's a necklace) done tomorrow, so I can announce the giveaway, but my recovery is a little more painful than the doctors had anticipated, due to the amount of muscle involved. Hopefully I'll be able to work on it tomorrow or this weekend, so I'll try to announce the giveaway by Monday!!


Friday, August 5, 2011

We went out of town again

But alas, there was no time (and no place!) for any bead shopping. So, I spent a lot of time perusing the interwebz (after my son was asleep at night, of course!), and finding new, fun supply shops and design inspirations.

I love making jewelry, but lately, I'd been feeling a little bit restless, and frankly, a little bored with my designs. I've decided that it's time to branch out and try some new things with my designs. I haven't had a chance to work on much yet, as far as new designs go, though, but hopefully soon I'll have time.

I'm going to be incorporating more clay in to my designs, and I'm going for a more rustic look to my pieces, as opposed to the symmetrical and clean designs I've been creating lately. This may or may not involve taking apart some of my jewelry that I've already made, and re-purposing the components.

I'm also planning on utilizing different metals - sterling silver is just so stinking expensive, so pewter, brass, copper, and aluminum may be making appearances in my jewelry. I'm even thinking about trying my hand at some toggle clasps made from polymer clay. That would be fun!

I think the last part of my new business path will include some sort of re-branding. So if you know anyone who is handy with creating web graphics, can you send them my way, LOL?

I know this post was completely lacking in photo goodness, but I do have some things I've been working on, so I hope to have something to show you all soon!

Monday, July 18, 2011

Why I make things...

That's my little dude. When he was about 1, we decided that I would stay home with him, and MAN, has it been a lot of work! No time for make-up, or doing my hair most days. Jewelry is quick to put on, and make me feel feminine, no matter what I am wearing, and that's something that I hope to share with others! And really, it's my little bit of "me" time, which I really need. There's no real story to go along with this... I just enjoy it!


On another note, here are how the owls turned out! They are listed in the shop - go check it out!!


Thursday, July 14, 2011

I'm BACK!

In defense of my non-blogging, I've been really busy! We went to AZ to see my family for a couple of weeks. While I was there, I did a home jewelry show, and then bought all of these BEADS!!


I've been making stuff with my new beads here, at my NEW DESK!! Since opening my Etsy shop 2.5 years ago, I've been working at the dining room table, or coffee table, so it was nice to finally be able to get a dedicated work area. I set up my work area in the family room, so I can work when Stephen is playing downstairs and still keep an eye on him. I've made many things here so far, all of which are now listed on Etsy.

Today I began work on a new clay project - owls! These are baked, but I need to clean up some of the texture, and then I plan on antiquing them a little bit. I have a lot of new ideas that I want to try out with my clay, so stay tuned!


(Oh, and these little guys are less than 1" long, and will become earrings)


Wednesday, May 25, 2011

Trying something new

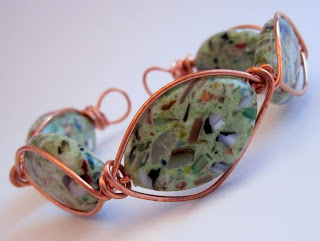
When we were checking out the fantastic bead store in Branson, it was obvious that the shop owner was quite the fan of wire wrapping. I'd taken a break from wire for a while, since silver was pricing itself out of my studio, but she mentioned trying copper, and I was inspired by her many cuff bracelets that she had made. This one, is my first attempt:


I don't know exactly what those beads are, but aren't they fun? Some sort of composite, I think, but they were nice and chunky, and just what I needed!! This particular design was actually pretty easy, so after I make a couple more, I may write up a quick tutorial for it.

I remembered over the weekend that I'd gotten some metal plated cabochon settings in a grab bag (not a good grab bag like at Auntie's beads... this one was pretty much a bust). I'd been reading that gold and pink were a hot color combination for spring/summer, so I thought I'd give this a shot. There is gold leaf mixed in with the 2 pink tones, and I paired it with my favorite accent color, stringing it from silk ribbon. This really does scream summer to me! It's just gorgeous in person, and not too big - only about 1" long! I also made one in shades of olive green, with Navy, Denim, and Purple accents.

So what have YOU been working on this week?

Sunday, March 13, 2011

I'm ready for spring!

Right now, as I look out the window, the sky is gloomy, and overcast, and it's been raining off and on all day. I long for green grass, brightly colored flowers, and my vegetable garden! So with that in mind, I made these two pieces the other day, and both are listed in my Etsy shop.

These earrings were inspired by the photograph for March in our Arizona Highways 2011 calendar. It was a macro-photograph with large fuchsia flowers, smaller orange flowers, with green foliage and small cream colored flowers. They aren't colors I would traditionally mix together, but I thought it came out beautifully! (and they aren't heavy either!)

I really love the color combination of brown and light blue, and continuing in my floral mood, I created this bracelet! I've had the light blue glass round beads for months, and hadn't used them yet, so I mixed the clay color to match. It's like getting flowers, jewelry, and chocolate all in one package! It's strung on stretch cord so it's really easy to wear.
I've been down with The Plague for the last 2 weeks, but I have more ideas in my head for flower beads, because I love them, and they are FUN! They are surprisingly easy to make, so I'll try to post my process when I make the next ones.
The first day of Spring is in one week, and you'd better believe I have my countdown set!!

Wednesday, March 2, 2011

Something new

Sometimes, I really get the itch to try out a new clay technique. I had been wanting to try out making these little embroidery-style flowers for a while, and recently, I had my chance! I made the pendant below on a light silver base, with rhinestone centers. It was actually easier than I had anticipated. (It also sold very quickly out of my store!)


I wanted to make MORE in that style, so with the Pink Variscite stone from my grab bag in mind, I created the beads below today.
I'll line the whole necklace out tomorrow, but I think I might need some smaller turquoise beads to go with it. I'll have to go through my stash in the morning. I like the gold with it, because it looks really great with the green, especially... I've had all of these Vermeil spacers sitting around for almost a year, but I think they will work well in this project.


Wednesday, November 10, 2010

Faux Ceramic Stars tutorial

I've really been enjoying this faux ceramic technique, so I wanted to share my method. It's really easy! Actually, most polymer clay stuff is really simple - all of the tools and different methods can make it seem intimidating, but if it is something you want to try, just get a few blocks of clay and play with it a little bit.

What you'll need:


White Polymer clay (I prefer to use Premo! as it is a bit sturdier after baking)

Liquid Sculpey or Liquid Kato (I used Kato)

Alcohol Ink

Texture sheet

Brayer or acrylic rod

Parchment Paper


You will need to condition about half of a block of clay. After your clay is conditioned, run it through on the widest setting.


Then fold it in half.
Next, create your texture! A really thick texture will make the coloring more interesting.
Next, use your cutters in whatever shapes you want

Poke holes if necessary (I'm using mine for a necklace and earring set, so I needed holes).

Then, bake at whatever setting is recommended for your clay type. For this project, I ended up using a little bit of pearlized white mixed with regular white, and since the pearlized white tends to burn, I baked at a lower temperature. Also, if you are baking on a metal pan, the parchment paper will keep the bottoms from discoloring.

While your stars are baking, you can pour some liquid clay, and mix in a few drops of ink. Let the alcohol evaporate a little bit.

Once your starts are done baking, you can use a blade to scrape off any imperfections (if necessary), and then using a small paint brush or your finger (with a GLOVE), apply the clay-ink mixture to the top of your clay piece. I recommend leaving them on the same baking pan so that the liquid clay doesn't run while you are moving the pieces.
Then bake again for 5 minutes or so, and voila! You have faux ceramic!


A couple of things to note: I almost always wear latex gloves while working with polymer clay. This is for 2 reasons - I don't want to have to sand off finger prints, and I really don't like the way it makes my hands smell. It's just a personal preference, but I highly recommend them for when you are working with the alcohol inks - those can really stain!

I used this same technique for these ornaments:

Have fun!